
Skinnies are the one technical trail feature I fear more than others. Say the word “skinny” and I break out in a cold sweat. It doesn’t matter if the skinny is six inches or six feet above the ground. Though I will occasionally ride skinnies, they intimidate me, and I tend to avoid them on my local trails.
For this article, Jeff Barber asked me to not only provide tips on riding skinnies, but also put the tips into practice and ride a skinny on one of my local trails. To help me do both, I leaned on Jeremiah “Scratch” Stone, a MTB instructor and trail builder who works with Ninja Mountain Bike Performance.
Mental preparation is vital to riding skinnies

I asked Stone where I needed to start with skinnies.
“Well the first step to getting better at skinnies is to stop skipping them! They can easily become a mental block and they’re never a mandatory thing in a trail, so many people never even try, or try a minimal number of times and then give up. It’s a super valuable skill to have and translates well to technical trail riding.” According to Stone, when riders get consistent nailing a small target with both wheels, then they can confidently thread the needle through some rocks or other nasty lines.
Stone advised riders to prepare themselves mentally by understanding how their bodies and minds react when confronted with a challenging feature like a skinny. “Everything in your body and mind will want to stiffen up and close in. Your body will want to drop elbows and get stiff in the legs, possibly leaning away from the feature, and you’ll definitely have to remember to breathe!”
To help riders become more mentally comfortable with riding skinnies, Stone also suggests they desensitize themselves in a low-risk setting. “Practice with the stripes in a parking lot, then maybe the curb where there’s a small drop to one side and a crease between the curb and sidewalk. What you’ll find is that there are some foundational skills you need to develop better.”
The two specific skills riders need to learn to get comfortable riding skinnies


Stone recommends riders work on two specific skills to help them ride skinnies with confidence. The first skill is the trackstand.
“The trackstand is the real value adding skill here,” said Stone. “The better your trackstand, the more comfortable you’ll be on a skinny. Practice a slow ratcheting technique, focusing on control and balance. Then find those little pauses between engagements and start extending them. One second, ratchet, two seconds, ratchet, then breathe. Always ratchet out when you’re practicing trackstands- it doesn’t do you any good to practice to failure and stepping off. Learn to anticipate when the trackstand is over, and ratchet to regroup.”
The second skill Stone recommends riders learn is bailing. “Learn to roll off small drops slowly safely. I teach a ‘peek and push’ technique that is very effective. Know what height you can comfortably roll off and keep that in mind. A small wheelie drop can be useful, using the power stroke and lifting the front wheel to keep the front end up. Lastly, practicing jumping out of the pedals and off to the side of the bike. Landing on your feet is going to be a lifesaver when the skinnies get taller!”
In terms of bike set-up, riders should consider using flat pedals and dropper posts when riding skinnies


Stone says that flat pedals really benefit riders on skinnies. “This is one of those skills that is much more forgiving on flat pedals. You’ll be able to step quicker and use your legs for balance to the sides if need be.”
Additionally, using a dropper post allows riders to maintain balance and be able to quickly bail from the bike when things go south. Stone suggests riders who have a dropper post put the seat down and out of the way before riding skinnies.
On the trail, keep these tips in mind when riding a skinny

When riders have the fundamentals down pat and are ready to ride a skinny on the trail, Stone has a few tips for them to keep in mind. First, “when approaching a skinny, remember that you only need as much width as your tires take up. Aim small to miss small and focus on where you want to go and nowhere else. If you’re constantly looking at the things you don’t want to hit, that’s where you’ll end up anyway.”
Second, Stone reminds riders to breathe. “This is the biggest pointer on approach. Take a good breath and relax with the exhale. Sometimes I flap my wings a bit to make sure I’m loose and ready to wiggle.”
Third, Stone notes that controlled momentum is an important key to successfully riding skinnies. “You want some roll to make balancing easier, but the faster you roll, the faster things can get off- line.” Stone tells riders to have enough momentum to get them into the skinny with minimal disruption. “If you’re having to ratchet weird to get up on there before you even start to balance, you’re adding extra difficulty to it.”
Lastly, Stone advises riders to minimize the disruptions to maintain balance. “Everything you do can be a disruption if done poorly, so be very smooth with the brakes and ratchet engagements. Kicking and flailing around will surely throw you off course. You can also use a lifted foot and extended leg to counterbalance when needed.”
Skinnies with curves or elevation present additional challenges
Straight skinnies on a level surface are challenging enough. Add elevation changes or curves and things get dicey. That’s where good trackstand/ratcheting skills can make all the difference according to Stone. “With a good trackstand and ratcheting technique, you can add very controlled front and rear wheel lifts as well as level lifts where you can adjust the bike laterally.”
For skinnies with curves, Stone reminds riders to be mindful that the front and rear wheel will follow different paths. He suggests riders get used to the fact by practicing the ‘rock dodge.’ “Go around a small obstacle like a cone, leaf, or rock with the front wheel and inside of it with the rear wheel.”
For skinnies with elevation gains, Stone emphasizes the minimal disruption idea. “Use smooth ratchets or surges to get you up on top and very controlled braking to get you down.”
Stone had some final advice for me before I set out to try riding skinnies

Once I had a pretty good grip on my trackstand/ratcheting skills and I had practiced the techniques in low-risk scenarios, I felt I was ready to ride a real skinny. Stone offered me some final advice before I set out to attempt it.
Stone told me that, when I sized up a skinny, I needed to ask myself what I have done to prepare for riding it and what my plan is to successfully do so. He suggested I match my skinny of choice with my skillset while I learned. “It may need to be something very low like a board on the ground. Then maybe something up a few inches with a little width to be forgiving.”
From there, Stone told me that my ability to find comfort in the pauses and to safely bail when necessary will be the main drivers for my progression. “And at some point, way down the trail, you may find yourself in a skinny situation where bailing is no longer an option. That’s when your practice pays off and you can rely fully on your ability to commit, adapt, and make it happen. Just don’t forget to breathe!”
Putting Stone’s tips into action


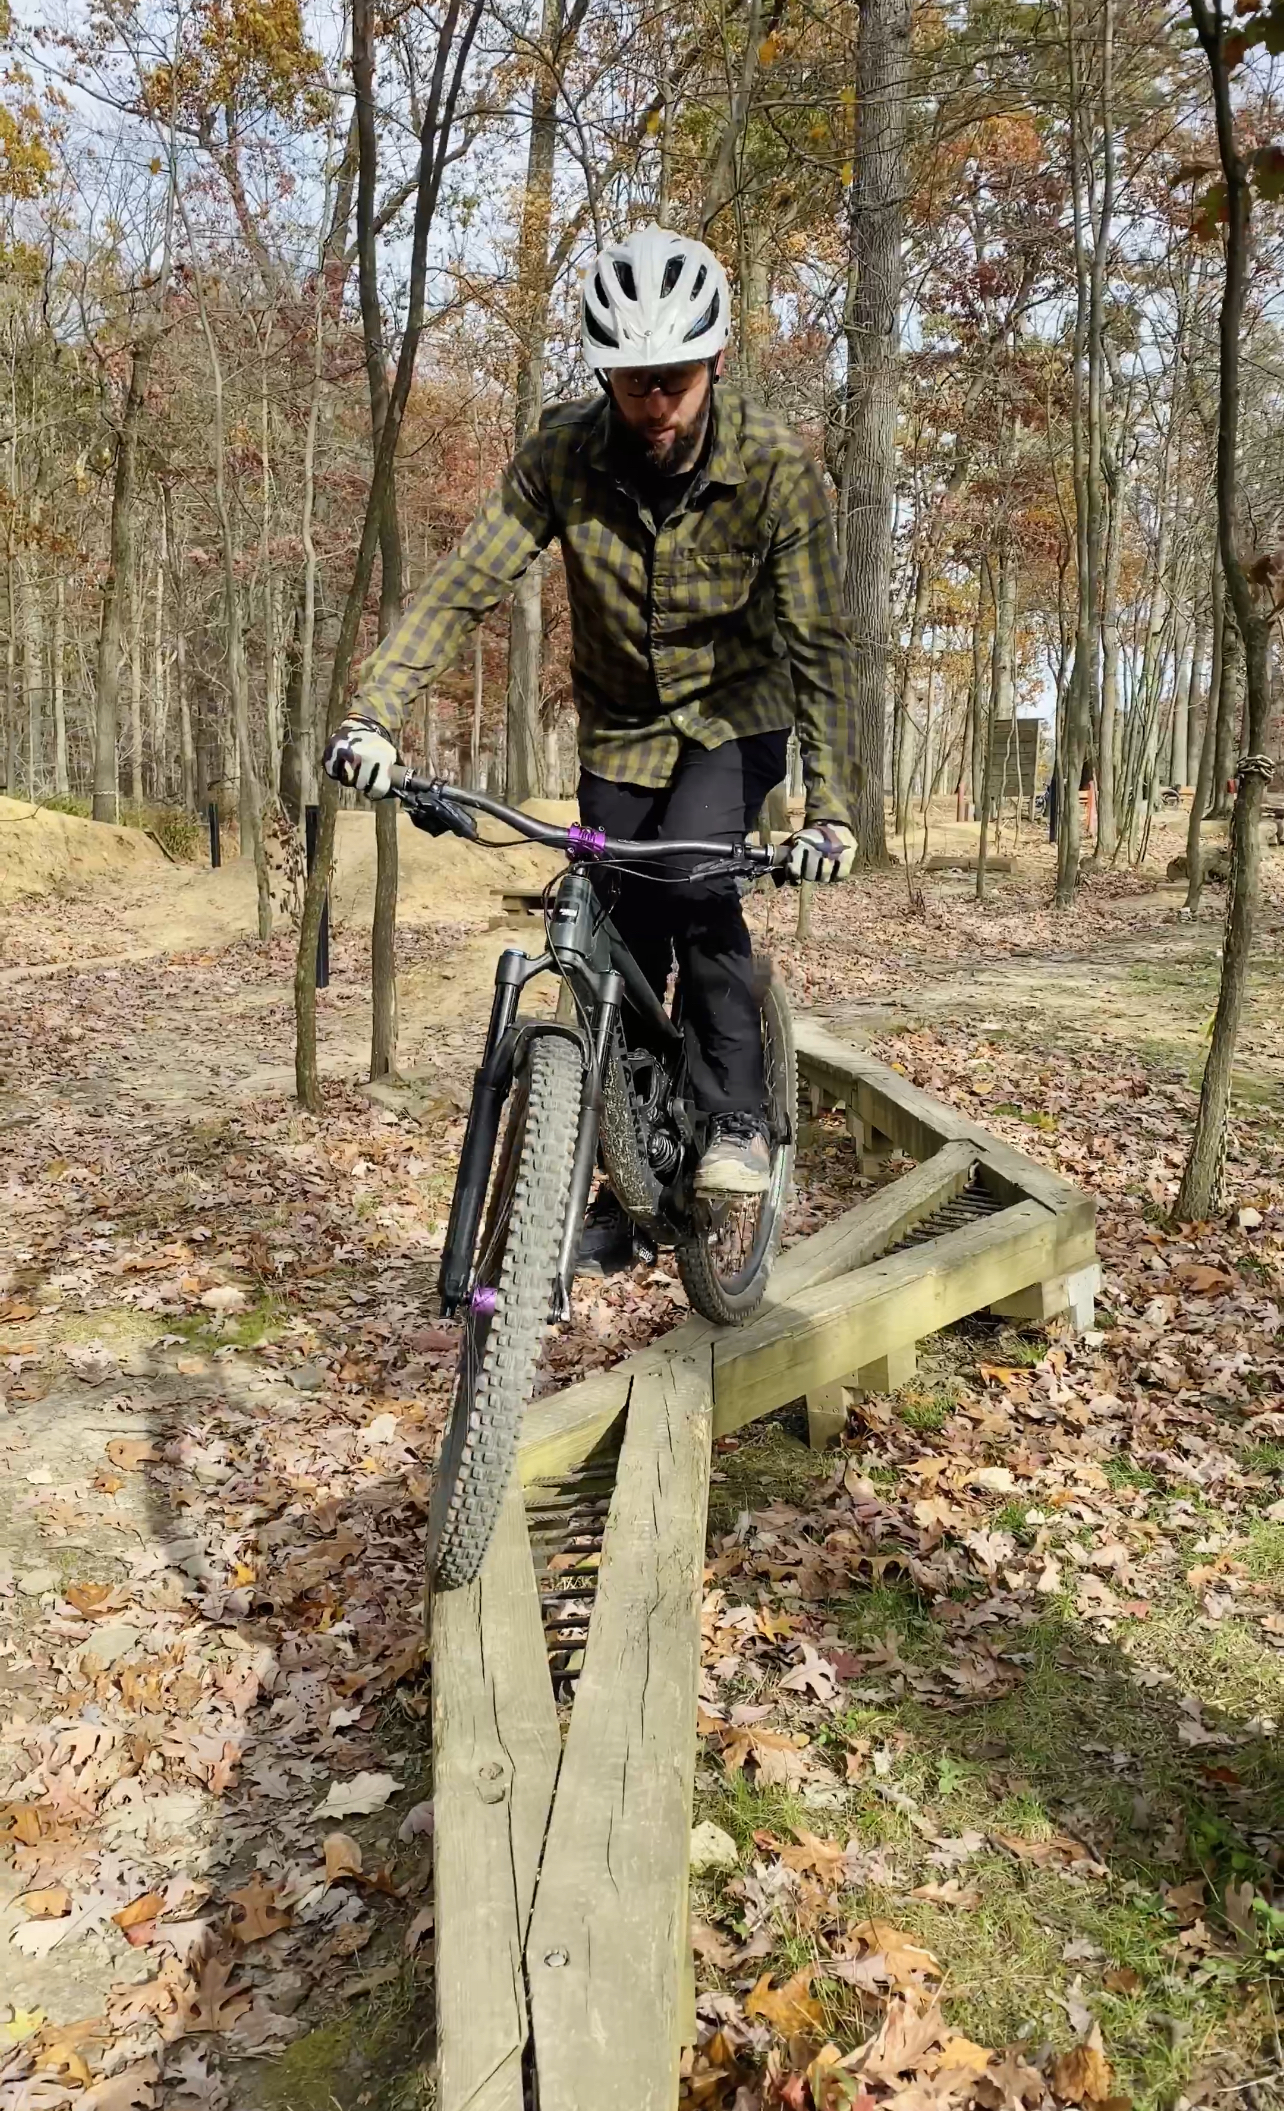
I chose a skinny I pass by on a regular basis to ride for the article. It lies near the beginning of the Magnolia Trail and is approximately 45ft long. The skinny is not high off the ground, but it has elevation gain when ridden in the preferred direction of counterclockwise. I’ve attempted it a few times, and have even successfully ridden it once or twice, but I’ve never had confidence on it. Usually, I bail off it before I reach the end. My goal was to ride it with confidence three times in a row.
On the first pass, I got a little momentum going, took a deep breath, dropped the seat post, and hit the skinny going uphill. I kept my eyes locked on the end and made it 99% percent of the way before dropping off.
The second pass was made going downhill. It was much easier to control my momentum in this direction and I cleaned the skinny successfully. Stone’s tips were spot-on, and the little practice I did beforehand made a difference in my confidence.

I made a few more passes in both directions. Some were successful, others were not. The times I failed were due to me either having the wrong speed or looking down instead of forward. I didn’t make three in a row, but I did make it three times. I also discovered that Stone’s advice on skinnies applied to other parts of the trail. After I sessioned the skinny, I cleaned a rooty climb I normally struggle with using the techniques Stone told me.
With practice, skinnies can be a fun feature to ride
Stone’s tips definitely helped me get over my fear of skinnies. I now see the benefits of riding them on a regular basis. They help riders develop better balance and bike/body separation and learn the importance of momentum when it comes to cleaning obstacles on the trail. If an old(er) rider like myself can learn to ride them, then others can too.


Great article and this is really spot on advice. I have been trying to figure out the best way to teach my kids since I just had to learn on the go while beating myself and my bikes up in the process. I think I will build some in the yard now and get them to apply these techniques. Well done Singletracks and Richard! This is the type of content we would all love more of fwiw. I know there are more articles but jumping and hitting berms etc.. could all use some refreshers and good articles just like this. Take care.
Thanks for great feedback. I really enjoy bringing this kind of content to readers and it helps me get better at riding too. I hope I can do more of these articles in the coming year.
I’ve never seen the most useful tip for riding skinnies in any article on how to ride them. Feather your brakes slightly and pedal against the resistance (with little or no weight on your saddle). This lowers your center of gravity and can feel like someone just flipped the ‘on’ switch. Seriously, there is a night and day difference; try it.
Thanks for the tip!
Really good article and I can relate 100% to this issue. I am still in “practice” mode but the tips here will help. 3 in a row…..that’s the 1st target goal !
Thanks! I appreciate the feedback. I can tell you that it does get a little easier with practice. Stone’s tips really helped me.
I use a couple low risk skinnies in the “skillz park” of our main TH as a pre ride warmup. Each are about a foot wide, but are around 100′ long with a few boulders intersperse. Both have a gentle curve and never get much more than a foot above the ground. I feel they help me dial in my balance and focus before hitting the trail.
That’s an excellent idea. Thanks for sharing it.
Nice article! I have been involved with creating a few log skinnies near me. Great use of a downed tree! I have ridden them a few times but this article will hopefully help me approach them with more confidence. I have to wonder (maybe not) what the neighbors were thinking as I rode the curbs in front of the house….
Thanks for the feedback. I’m glad you found the tips to be helpful.
Focus not on your front tire! It will go to the landmark just ahead of you.
Relax and loosen up since being tense will also make it more difficult.
Well done, Mr. Shoop!
Thanks! I appreciate it.